Apr 3, 2009

Carciofi alla Romana recipe

Artichokes are one of the nicest things about winter in central Italy. They appear with the leaden skies of December and accompany us through the beginning of spring, in April. They come in a tremendous variety of shapes and colors, from tiny delicate ones well suited for being eaten raw in Pinzimonio (a dip made with simple olive oil and salt) or preserved sott'olio (in oil); to purplish green grapefruit-sized ones suitable for sauteing, stuffing, salads, making pasta sauce, frying and whatnot. Since this is the end of this adorable bounty, why not use up the last artichokes for something sassy and palatable?
carciofi, Italian for artichokes

The globe varietal is considered throughout the world as the true artichoke, in Italian food classification however it is the Roman. No matter which variety you select, you have to do so with great care, because a fuzzy choke is a tremendous disappointment. Like any good orange, a good carciofo will feel firm and solid when you pick it up. It should squeak yet shouldn't give if you clutch it gently, nor should it feel light. If it does, it probably has air (and thistly fuzz fiber) in its heart. Pass it by.
Once you have selected your artichokes and gotten them home, stand them in a vase with water until you're ready to use them (they are flowers, after all). If need be you can keep them like this for a day or two, but they do tend to toughen with time.
The secret – admitted it can be called that – for preparing an artichoke is knowing how to trim it, that is how to free it of the tough leaves, bitter outer stem part and inner fuzz we Romans call with the generalizing term barbe, for "beards".


First of all rub your hands and fingernails with lemon juice, to avoid them from blackening, artichokes do that. Next, slice off the tough, pointy spiked tips and the outer coriaceous leaves, working inwards to where the leaves are more tender and light colored.

This is much like peeling an apple. In the process the artichoke will become spherical.

Be sure to keep rubbing it with lemon juice as you trim it along.
When that's done, the stalks need cleaning, trimming away the ridged outer part while leaving the heart intact. If you look at the end of the stem you will see a ring; trim away the outside og that ring, without shortening the stalks: if properly cleaned, the stems are the sweetest, best tasting part of the artichoke!


Now that the hard part's over, here's how to cook carciofi, Roman-style. This is one of my all-time favorite side dishes. I have to thank my eldest sister Amy, for that. She's the one who taught me to appreciate artichokes when I was 8 years old. I never stopped eating them since. There's a quick "how-to" video at the end of the recipe.

5 artichokes, trimmed
2 garlic cloves, unpeeled, smashed
1 small bunch of mentuccia
1 glass of water
1/4 cup olive oil
3-4 new potatoes, quartered
Salt

Place the trimmed artichokes standing stems upward in a pot whose sides are high enough to keep the artichokes upright in a single layer as they cook. My pot fits 4-5 depending on their size.

Pour 1 glass of water and the olive oil, the garlic, the mentuccia and potatoes. Season with a pinch of salt. Set the covered pot to simmer on medium-low heat.

The trick is to place a sheet of brown paper between the lid and the pot to create a barrier that will seal off any steam from escaping the pot.

Cook for 10-15 minutes without ever uncovering.

The artichokes are ready to be served hot, though they're also excellent cold the next day.

Apr 2, 2009

Pezzogna all'Acqua Pazza recipe

My Amalfi Coast friends are very familiar with this dish. This is the area's signature fish recipe, made with all-local ingredients. White fish cooked all'acqua pazza, literally, in 'crazy water,' is one of the simplest ways of preparing fresh fish.

acqua pazza, the simplest southern Italian fish recipe
Photo courtesy of ioviaggio.it


The origin of acqua pazza dates back to 1800, this cooking technique was practiced mostly by the less fortunate fishermen of Campania, Lazio, Sicily, Calabria and Puglia. These seafarers prepared their lunches on board their boats and instead of seasoning their seafood recipes with salt––which was too expensive––they used sea water, in addition to tomatoes, garlic and olive oil. So fresh fish, and unpolluted sea water, were a must. The unique flavor of acqua pazza lies in the simple combination of salted water, the fluids released by the fish and the tomatoes. The best to use here are the the terrific pomodorini al piennolo, a variety of local teardrop-shaped vine tomatoes which are harvested in clusters and hung on beams and trellises to ripen.
pomodorini al piennolo, Naples

The ideal fish to use for this recipe is the Mediterranean pezzogna (or pagello), which goes by the English name bluespotted, red or blackspot Seabream (Pagellus bogaraveo). This is a salt water fish that swims in the deep Sorrento peninsula and Amalfi coastal waters around the islands of Capri, Ischia and Procida. It's very similar to pandora or snapper.
pezzogna, or pagello - Mediterranean seabream


Here's the recipe for "crazy water"
Any one of the above mentioned fish, weighing 1kg (2 lbs)
250 g (1 cup) organic, possibly vine-ripened heirloom tomatoes, quartered
2 garlic cloves
A small bunch of Italian flat leaf parsley, finely chopped - I use basil instead
Slices of sourdough or country-style bread for bruschetta
Extra virgin olive oil
1 glass of dry, white wine
Salt

Soak the tomatoes in water and baking soda to remove any traces of dirt, then rinse well and pat dry.

Clean and scale the fish. Put it in a pan with two cloves of garlic, parsley and the tomatoes. Add the glass of wine and enough water to soak the fish half way. Cover the pot, bring the water to a boil, and simmer the fish until done, about 10 minutes.

In the meantime, make bruschetta: lightly toast your bread, rub the slices with the remaining garlic clove, and season them with a thin drizzle of olive oil. Divide the fish into 4-5 portions, arrange them on the plates, and serve with the bruschetta, and plenty acqua pazza sauce on the side.

I love this recipe's simplicity. It can also be enriched with the addition of clams or mussels, to be added 2 minutes before serving so as not to overcook them.

Tip: Make sure the fish cooks only half soaked in the crazy water, too much would drown it.

Apr 1, 2009

Lasagne al pesto recipe

This is a pleasant alternative to the meaty "red" lasagna. The delicate mixture of flavors, and the lightness of this particular baked dish make it an excellent starter. For those concerned with ethical eating, pesto lasagna is furthermore a vegetarian preparation.
pesto lasagna recipe
Image © ricettablog.it
Let's talk ingredients before we begin cooking. If you've been following this blog, you'll have recently learned how to make your own homemade fresh pasta from scratch. You can either decide to apply that pasta knowledge with this dish, or turn instead to packaged dry lasagna, if pressed for time or just plain lazy. In both cases, you'll need to pre-cook the lasagna sheets before assembling the actual dish.

Now onto the condiments. If on one hand I trust store-bought pesto sauce (there are even some brands which market organic pesto), I steer away from commercially-sold béchamel. There's something about mixing milk, flour and butter into homemade béchamel, that makes all the difference in the world. In this dish, the delicate white sauce contrasts the audacious aroma of the pesto, adding creaminess and a mild layer in the bold baked statement. Let's therefore begin by whisking up the béchamel, which is the "hardest" part of this otherwise very simple recipe. While you preheat your oven at 180°C (356°F)...

Assemble the following for the béchamel:

100 g (1/2 cup) flour, sifted
100 g (1/2 cup) butter
1 lt (4 cups) whole milk, boiling
A pinch of ground nutmeg
Salt

Melt the butter over low heat in a stainless steel pan. Gradually sprinkle in the flour, and stir well with a wooden spoon until smooth in consistency; cook gently until the mixture becomes a light golden color. Gradually add the boiling hot milk, stirring to avoid forming lumps. Cook for at least 15 minutes, stirring constantly.

When the béchamel becomes rich and creamy in consistency – not too thick and not to runny, rather forming ribbons on the surface as it dribbles from the spoon – remove from the heat, adjust salt, and add a wee pinch of powdered nutmeg.

Very good, upon completing this step, you're done 3/4 of the way. Is your appetite awakening?

Now we blanch and build.

1 kg (2 lbs) uncooked lasagne (store-bought or fresh)
200 g (1 cup) pesto sauce
Extra virgin olive oil
1/2 stick of butter + more for greasing the oven pan
Parmigiano, grated

Bring a large pot of lightly salted water to a rolling boil. Add a tablespoon of olive oil to it so the pasta won't stick during cooking. Cook the lasagne sheets for 5 minutes, fish them out with a slotted spoon and lay them flat to dry on a clean kitchen towel. Keep aside a glass of the pasta cooking water, and stir 2 tablespoons (or more) of it in the pesto sauce.

Butter a large, high rimmed 9" x 13" baker pan, and lay a single layer of parboiled lasagna sheets to cover the bottom, just barely overlapping them. Smear evenly with 3-4 tablespoons of slightly diluted pesto sauce and a wee drizzle of olive oil. Next, slather on the béchamel and a few flakes of butter. Dust with a light hand of grated Parmigiano, and repeat the layers until you reach the top of the baker pan, or you run out of lasagna sheets. Should find you are running low on béchamel, you can always make more. It's never too much. On the other hand, having too little could signify a dry, parched final outcome. We want scrumptious, succulent and creamy.

For best results, overdo the top layer with béchamel, butter flakes and grated Parmigiano.

Bake your masterwork, warming it through in the oven for 10 minutes, or until a crispy, golden crust forms.

The acidic sea tang of a good Vermentino white will offset the pesto's garlic perfectly, and have you smiling for days.

Mar 29, 2009

Homemade pasta from scratch recipe

Cookbooks may tell you how, but the best way to learn how to make fresh homemade pasta, is being taught by a friend. Someone you can observe, the person to question shamelessly as the eggs and flour become an art form from bare hands. One you silently accost to absorb the moves and the inherited skill, in order to make your own rustic "pasta fatta in casa."


Theoretically, the first step is reading the do's and dont's of how to make pasta from scratch in erudite manuals. This I fear may only confuse you. Some recipes call for no extra yolks, some add a nip of water, some omit the salt. In my humble opinion, the actual hands-on (no pun intended) technique needs human guidance. Your Pasta-Petrarch should demonstrate the steps to a personal approach, illustrate how to properly blend the elements, how to knead lovingly, and how to shape it all into a galaxy of dinner possibilities: fettuccine, ravioli, tagliatelle, lasagne, tortellini...


So here I am. I know, ideally I should be from Emilia Romagna and in my mid-seventies, but this is the best I can give you. I make my friends and family very happy with my dishes, and when these involve fresh homemade pasta, the bliss-factor is raised tenfold. I have learned this magical art by absorption. I grew up watching my grandmother nonna Titta make home-style pasta, so my credentials are good. I've spent numerous childhood hours watching her bent over the squared 4-ft wooden board, kneading a golden orb of dough the size of a soccer ball. Dusted with flour head to toe, she'd twirl and play her rolling pin like a teenage majorette. I was always in awe as the thin layer of pasta was rolled like a giant burrito and then cut into curly tagliatelle ribbons or thin, blond angel hair. I soon began to emulate her, and I have been practicing pasta for quite some time now.

It's a gesture of love to serve a meal entirely made by hand. It also makes the cook feel omnipotent, a bit of a show off. Tripping on a pasta-from-scratch-high you feel invincible, you push your limit, confident that now you can accomplish anything in the kitchen. Like I did today, for example. I ventured in a full-fledged 4-course meal for 6 hungry epicureans.

I crafted my tagliatelle while I prepared the sauce to dress them appropriately,


...breaded and fried 12 schnitzel-type veal cutlets for our second course,


...cooked 2 different vegetable side dishes (creamed pumpkin and stir-fried broccoli) and baked dessert. I refused to do the dishes and now I'm here moaning about how tired I am, but you should have seen the smiles on those faces.


But let's get back to business. Here is nonna's recipe for homemade pasta from scratch, transcribed and translated straight from her tattered and handwritten recipe journal, one of my most precious belongings.

300 g (1 1/2 cups) flour, possibly "00" + more for dusting
3 eggs
2 yolks
A very small pinch of salt


You'll need to work on a flat surface, possibly wood or marble, as long as slightly dusted with flour. Other essentials are, a rolling pin (again preferably wooden), and a little patience.

Wash your hands and beware, it’s going to get messy. And quite sexy.

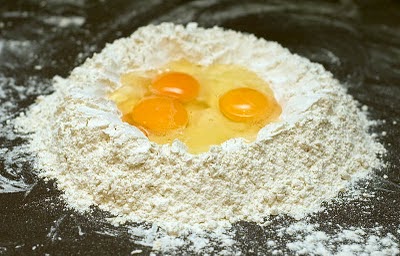
Empty the flour on the work surface in a mound, and dig a hole in the middle, building a crater. This is the "a fontana" technique, literally "in a fountain manner." Now drop the eggs and the yolks in your crater and sprinkle the salt.


Start beating with a fork at first and as the mix begins to blend, dig in with your hands and knead that baby.


Image © robysushi


Image © winedharma

It will not be at all homogeneous at first. Knead regardless of messy, sticky onset. Fold the dough over and flatten with the bottom part of your palm several times.


Image © lafataartigiana.blogspot.com

Be persistent, the love you put into this part of the process ensures best results. Keep at it until the dough reaches a smooth and satiny texture. It should never flake or dry, if for some unknown reason this should happen, add another egg, NOT water. The result at the end of this sensual massage is a large, heavy ball of dough. Lay it to rest in a bowl dusted with flour, while you take a 30 minute break.


Image farinadigio.eu

Well done, you have dough. Now, mentally prepare for the hardest part, flattening the dough with your rolling pin into a thin layer.

On a large enough unpolished wood surface - like a butcher’s block for instance - or your marble counter top, spread a large quantity of flour. This will avoid stickage. Dust it over your rolling pin and hands as well, gymnast-style. Place the ball of dough in the middle of your board and flatten it gently with your hands, avoiding finger holes. Any deep depression in the dough can cause air bubbles. And we don’t want those.


Start using your rolling pin, exercising very little pressure at first and slowly picking up force as the dough gradually flattens. As the surface begins to expand, images of the ‘old blanket’ saying will come to mind. You’ll find that rolling vertically will produce a long narrow up and down strip; compensating with horizontal strokes, your shape will instantly stretch into an opposite elongated oval. Keep going, don’t give up, and mostly don’t flatten the dough too thin. You’ll need a maximum thickness of a couple millimeters (about 1/8-inch).

To make fettuccine you simply roll up your flattened dough like a burrito and cut 1cm slices, about 1/3 of an inch.


Unravel the coils, dust with a bit more flour or polenta (cornmeal) and award yourself with a tall drink.

Tagliatelle are a bit wider (and thicker), Pappardelle are the widest, about 2cm (2/3-inch). Cutting lasagne requires a firm hand and geometric eye when shaping equal-sized rectangles. My guideline is a 10 x 15cm postcard (3” x 5”).

Maltagliati (which are great for hearty soups) means "badly cut", so you can go crazy and cut away any shape you like as long as in similar size range.

Tip: Cook fresh homemade pasta in plenty of lightly salted water at a jacuzzi-type rolling boil. Stir with a wooden spoon or a long fork quite often. This will ensure the pasta to remain springy and not clump together in clusters during cooking.

Drain your masterpiece and slather on the sauce, whatever that may be (after all that hard work you can start with a simple Burro & Parmigiano: 1/2 stick of butter and a fistful of grated Parmigiano, an awesome flavor duo), and graduate to ragù later.

Congratulations! Feel the awesome sense of achievement?

Thank you Laura. There's a chair here at my dinner table with your name engraved on it.

Mar 27, 2009

Emi's pork roast recipe

I noticed I've posted quite a number of recipes for fish, desserts, soups, vegetables, and pasta since I started blogging. Not to mention my love affair with cheese. What was missing so far was a proper carnivore's weekend entree. One to be made patiently and for the entire family, one that requires time and that will spill delicious aromas in the rooms near the kitchen.

The Italian word for roast is arrosto, a term that encompasses so much more that a mere cooking technique. It is an adjective, a noun, an onomatopoeic poem.

My mother’s theory is that if you can properly roast meat, you’ve learned how to cook. This was my 'test paper' when I first left home and had my mom over for lunch, what feels like a million years ago. My graduation to grown-up world.

I remember that day: the anticipation, the frenzied behavior, my nervous attempts to make it all perfect. Shopping for the right ingredients, assembling her favorite flowers and maniacally cleaning the house, readying it for her inspection. Not that she's much of a cleanliness freak, or someone fixated with order or form, but I wanted her first impression to be speckless. I wanted to prove that I could not only manage a home on my own, but that I could make one mean roast, too.

In Italy women leave the nest not upon going to college, but once married off to a husband. A man who - in a time not so distant in the past - would mainly be looking for a duplicate of his mother. I was 22 and single, my American side bludgeoning for autonomy. Through the conflict that ensued, I translated the energy into cooking and trying to reproduce my mother's and grandmother's culinary art.

So there she sat, eating quietly. She had a second helping... promising - I thought to myself, as I scanned the room for decoration debacles. I knew things were looking good when she sopped up the roast drippings with a chunk of bread, raising her eyebrows. My heart was pounding, and I'm sure she was feeling under examination too; but that didn't stop us from finishing our food, casually chatting and laughing (three elements of a perfect meal) as we always do.

The final Cordon Bleu moment came when she looked up at me with the most radiant of smiles and said, "La mia bambina ha superato la maestra!" My little girl has outshined her teacher.


My mother, Emi
1969


I passed the test. Here's how I did it back then and how I still prepare my Arrosto today:

1 boneless pork rib end roast, weighing about 1kg (2lbs). In Italy we call this cut arista
5 rosemary sprigs
3 tbsp extra virgin olive oil
Salt and freshly ground black pepper

Preheat oven at 160°C (320°F).

Trim away any fat from the roast and lace it with butcher’s twine to help it maintain its shape. Rub the meat with olive oil, and salt and pepper, massaging in the elements with love. Weave the rosemary twigs between the meat and the kitchen string, and place the prepared roast in the oven, using a high-rimmed oven pan (juice collecting is a must here).

Bake for an hour or until fork-tender. The meat must be well done but not overcooked, this will depend greatly on the size of the roast and oven power; it will be done when you stick a skewer into the middle and the juices run clear. A trick is to fill the drippings pan (one level beneath the roast pan) with water to maintain a good moisture level in your oven.

Remove the roast to a wire rack and let it cool for 15-20 minutes. This is an important step, juices tend to concentrate in the innermost part of the roast. By slicing it straight out of the oven, you would end up with a very watery and unattractive arrosto. Letting it rest allows the fluids to redistribute in the peripheral tissues and render a firm, juicy slice.


Discard the twine before carving. I usually serve my pork roast with applesauce and a side order of pan-fried string beans tossed with a clove of garlic, a fistful of toasted breadcrumbs and a thread of olive oil. 

"Il vino," you ask? Splurge with a Brunello di Montalcino, you deserve it! That or any rich, tannic red.

Buon appetito!

Share!