Showing posts with label sauces. Show all posts

Dec 1, 2011

Maionese recipe

Image © ecosalon.com
Homemade mayo rocks. Better tasting and definitely wholesome compared to the crap commercially sold in a jar or worse, in a tube.

The difficult part in making it at home is not having it separate while you add the olive oil as it thickens. In Italian we say our mayonnaise is impazzita, "gone crazy" when that happens.

To avoid this, some experts suggest to make it alone, without exterior noises, or disturbances. Some even push it as far as saying not to make it during your menstrual cycle.

Nonsense, I make it all the time, with kids playing soccer in the living room, or with heavy metal blaring in the background. Here's how I prepare it, foolproof and craziness-free.

1 egg yolk
1 tsp white wine vinegar
2 pinches dry mustard
Salt and freshly ground white pepper
150 ml (3⁄4 cup) extra virgin olive oil
Juice of 1⁄2 lemon


Put the egg yolk, vinegar, mustard, and a little salt and pepper in a medium mixing bowl and whisk until foamy and thoroughly blended. I use one of the small wood whisks pictured above, but a silicone whisk works well too


Tricky part.
Add 50 ml (1⁄4 cup) of the olive oil, a few drops at a time, whisking constantly.
Gradually add the rest of the oil in a thin, steady stream, continuing to whisk as the mayonnaise thickens.

Add 1 teaspoon of the lemon juice, and adjust seasonings if necessary. But the less you mess with mayo, the better.

Sep 8, 2011

Confettura di Cipolle recipe


Pairing sweet and piquant preserves with foie gras sandwiches, terrines, roast pork, wild game and (mostly) cheese is my thing. Caramelised onion marmalade being my favorite.

It was a huge hit with my American family visiting Italy a few weeks back, and when it happened to complement a mixed platter of artisan cheeses at an Abruzzo inn, the jar of onion jam was scraped clean.

It's a tangy chutney-like preparation, in fact many Italians refer to it as "mostarda di cipolle," a common moniker for sweet and spicy fruit or vegetable relishes. It's an available item in most Italian delis, but I prefer making mine at home.

This particular one is good with goat's milk cheeses, aged and smelly ones, or a humble chunk of Parmigiano. It tends to overpower the cheese flavor, so should be slathered with measure.

2 kg (4.4 lb) red onions
400 g (14 oz) organic brown sugar
500 ml (2 cups) balsamic vinegar
1 tsp. mustard powder

Sterilize the designated mason jars (+6 medium capacity) by boiling them in plenty unsalted water for 10 minutes.

Trim away papery outer shells and peel the onions clean. Thinly slice them while holding a chunk of bread in your mouth to prevent tears.

Wilt the onions with 2 tablespoons of water in a large heavy-bottomed saucepan over very low heat. Gently simmer until they become translucent, then add sugar and caramelize them slightly. Stir in the vinegar and mustard powder, cover and keep at a gentle simmer until the jam thickens (about 40 min to an hour).

To test for doneness, pour a drop of jam on a cold plate, if it slides off and is still quite runny, keep cooking until the drop sticks to the plate. Careful not to scorch it, though. Where there is sugar boiling, there is always that one split second of distraction that can cause the whole thing to burn and stick horribly to the bottom of the pan.

Divide the marmalade while still hot into the individual sterilized jars and quickly close with new caps. Turn jars upside down and cover them huddled together under a warm fleece or a woollen blanket. This assures vacuum and pasteurization. For safety, after a few hours, check that the vacuum valve is depressed on the lids. If the valve snaps, boil the jam jars in boiling water for 10 minutes.

When completely cooled down, store in a cool, dark place. Shelf life is about 6 months. Once opened, store in the refrigerator, and consume within the week.

Mar 1, 2011

Boscaiola recipe

One of my readers recently requested I illustrate this preparation, and share the recipe. Boscaiola (which rougly translates to, "in the woodsman's fashion") is a fall season condiment for fresh pasta, usually pappardelle––the broader fettuccine ribbons––made with porcini mushrooms and mild sausage.

But boscaiola is also a rich pizza topping, and a delectable one at that.
Image © hungryjenny

In the pasta sauce, sometimes bacon is used instead of the sausage. I've seen tomato puree, black olives and heavy cream added in some renditions too. Mine is simple, "leaner" (who am I kidding?) and quite easy to make. Porcini mushrooms are the key ingredient, so if you can't get fresh ones, in addition to whatever wild or cultivated kind available in your area, you can use dried porcini mushrooms, which when revived in lukewarm water lend a rich, heady flavor.

500 g (1.1 lb) pappardelle type pasta
400 g (2 cups) porcini, or any wild/cultivated mushrooms available in your area
50 g (1/4 cup) dried porcini mushrooms
100 g (1/2 cup) luganega-type Italian sausage, casing removed and flesh crumbled
200 g (1 cup) baby peas, thawed if frozen
1 clove of garlic, minced
Extra virgin olive oil
1 tbsp. butter
Dry white wine
Salt and pepper
1 tbsp. Italian flat leaf parsley, minced
Freshly grated Parmigiano cheese (optional)


Clean the mushrooms, brushing the dirt away from the stems with a wet sponge. Separate the caps from the stems, and cube both.

Steep the dried mushrooms in warm water for 20 minutes, then mince them, and add them to the rest of your cubed mushrooms. Strain the steeping liquid, because it most probably contains sand, and keep it aside for later.

Blanche a cup of baby peas and set aside.

In a casserole, sauté crumbled sausage and garlic in a tablespoon of butter and a splash of olive oil. When the sausage has rendered most of its fat, fold in all the chopped mushrooms and a glass of wine, and simmer over a gentle flame for about 30 minutes. Ten minutes into the cooking, add the strained peas. Depending on how much moisture the mushrooms release, you may need to add more wine. Some use 1/2 cup of heavy cream instead, at this point.

Whatever liquid you choose to moisturize the sauce with, this is the time to bring 3 gallons of salted water to a boil. When the sauce is close to being ready, boil the pappardelle. Drain the pasta al dente, season with the sauce, and garnish with very little parsley. For those who like it, a dash of grated parmigiano is always a good thing.
Image © tastingmenu.com

Buon appetito.

Dec 17, 2010

Salsa verde (and salsa rossa) recipe

Elemental foods can greatly benefit from a condiment. Just think how a roasted shank of lamb can find an excellent partner in a gentle complementary pomegranate sauce, or how piquant vinaigrette does justice to fresh garden greens, or even how much grilled zucchini and pumpkin love to bask in the simplicity of a bath of olive oil and balsamic vinegar.

There are also dishes that cannot be called complete without their supportive sauces and condiments, among these bollito misto and Fondue Bourguignonne immediately come to mind. The different flavors that pair with each morsel of tender cooked meat, make each bite essentially a different dish.

Rich, flavorful bollito misto is a traditional Northern Italian dish, particular of the Po River Valley. The mixed boiled meat feast is a regular winter evening offering at (mostly Northern) restaurants, where it’s wheeled out on a warmed cart and carved at the table.

Traditionally, bollito misto is made of seven cuts of meat, seven vegetable side dishes and seven sauces. Families make it on weekends to celebrate special occasions. In my home, it's a Christmas Day lunch staple.

Today I'm sharing my Nonna Titta's two traditional Piemontese meat seasoning condiments, Salsa Verde and Salsa Rossa: the keystone elements of the complex bollito misto ceremony. 

While your large chunks of meat cook in seasoned broth until tender enough to be eaten with a fork, you can assemble the following:


Salsa verde
This spectacular sauce also goes by the name bagnét vert, or little green bath. 

1 hard boiled egg yolk
1/4 pound of parsley
1 garlic clove
2 salted anchovies
2 slices of stale bread, crusts removed
2 small mild pickles (without dill would be better)
1 teaspoon capers, rinsed
A little less than 1 cup of red wine vinegar
1/2 cup extra virgin olive oil

Soak the bread in the vinegar. Bone and wash the anchovies. Mince them along with the parsley, garlic, egg yolk, and the pickles. Gently wring the bread to drain it, and add it to the mixture; continue mincing with a mezzaluna for a couple more minutes, then transfer the blend to a bowl.

Using a wooden spoon, slowly stir in the olive oil, working the mixture well to obtain a fairly fluid, emerald green sauce.

Tip: Best if prepared one day prior to serving.


Bagnét ros
Keystone number two. Jazz up your bollito misto by adding this red sauce to boiled beef, chicken, veal, cotechino, tongue and testina (calf's head).

1 kg (2.2 lbs) ripe tomatoes
400 g (2 cups) onions
2 medium carrots
1 celery rib
3 garlic cloves, minced
1 tablespoon sugar
3/4 cup extra virgin olive oil
Salt

Coarsely chop the tomatoes, onions, carrots and celery, and put them all in a pot with half the oil. Bring the vegetables to a boil, reduce the heat to a minimum, and stir in the sugar.

Simmer uncovered for about an hour.

Purée the vegetables through a foodmill into a bowl, stir in the remaining oil, and add salt to taste.

Buon Appetito!

Dec 3, 2010

Pasta alle noci recipe

A couple of weeks ago I posted a recipe for a Ligurian specialty, focaccia stuffed with cheese, a sinfully tasty delight. Today I want to tell you about another typical recipe from that blessed region: salsa alle noci.

Ligurians dress their pansotti (herb-stuffed ravioli) with this creamy walnut sauce. It is however also excellent daubed over spaghetti, ribbed penne, mafalde or linguine (or any other pasta type that "grabs" the condiment).

Traditionally salsa di noci was called tocco de nux and prepared with walnuts harvested during the autumn months. To make your own nutty concoction, assemble:

150 g (3/4 cups) husked walnut meats (you can blanch them to make peeling easier)
4 tablespoons extra virgin olive oil
1 garlic clove, minced
1 pinch of dried marjoram
100 g (1/2 cup) fresh ricotta cheese
Salt and pepper


Using a mortar and pestle (or thrown in a blender), reduce the walnuts, garlic, marjoram and a pinch of salt to a fine powder, diluting with a thread of olive oil. Work in the ricotta with a fork, and blend well.

Use 2-3 tablespoons of the obtained sauce to dress your pasta. Always remember to save a small amount of starchy pasta cooking water for a creamier effect.

The completed dish can be dusted with finely grated Parmigiano Reggiano, a spin of the pepper mill, and garnished with a fistful of coarsley ground walnut meats. Serve lava-like hot in contrast with the chilled bottle of stand-by white wine...


Note: For those who have trouble with garlic, in this dish, it can be substituted with less pungent chives.

Mar 4, 2010

Salsa di Cipolle - Onion compote recipe

On those evenings when I decide to make fondue bourguignonne, this savory compote is always a hit. The coupling of lightly cooked morsels of beef and these sensual onions au vin is emotionally touching.

3 medium red onions
1/2 lt (2 cups) good quality red wine
Butter

Trim away papery outer shells and peel the onions clean. Thinly slice them while holding a chunk of bread in your mouth to prevent teary eyes.

 Image © coingourmand


In a saucepan over low heat, simmer the onions in a tablespoon of butter. As the onions begin to sweat and become translucent, they will dry. Add small quantities of wine, little by little, allowing it to evaporate and stain the onions.

This operation requires a little patience, so relax, observe the beautiful deep burgundy color in the saucepan and inhale the fumes until you've used up all the wine.

Image © cucinaconleli


You're welcome.

Jan 14, 2010

Clementine sciroppate recipe

The marketplace these days is a beautiful winter palette. If you've visited my photoblog Tuesday Jan. 12, you'll have noticed the gorgeous abundance of this season's produce: different kinds of artichokes, broccoli, cauliflower, puntarelle, crisp fennel bulbs, ribbony radicchio, cavolo nero, pumpkins and parsnips; and also wonderful wild kiwi fruits, blood Tarocco oranges, juicy apples and clementines.


Clementines are a very popular smooth and glossy citrus fruit. Initially imported from Spain, Morocco, and other parts of North Africa, Clementines are a cross between a sweet orange and a Chinese mandarin. They are small, very sweet, and usually seedless. Many think of Clementines as small tangerines, but they're a different variety entirely, with a distinctive taste. The y produce a delicious fresh-squeezed juice, but Clementines are mainly an eating fruit. Its small size and lack of seeds make it particularly popular with kids.
They appear on market stalls in the northern hemisphere around November, and they are available for 4-5 months.

Canning them is an excellent way to carry the flavors of winter over into the summer months. The zesty citrus and their syrup are quite pleasant over plain vanilla ice cream, or fresh ricotta, Asiago or goat cheese; or as a topping for spongy chocolate cake.

1 kg (2.2 lbs) small unwaxed, organic clementines
200 g (1 cup) sugar
1 lt (1 quart) non-sparkling mineral water (I use Evian)
4 to 6 10-oz capacity mason jars and capsule screw caps*

Sterilize the marmalade jars and by boiling them in plenty unsalted water for 10 minutes.

During this time, soak the clementines in water and a fistful of baking soda to remove any outer substances from the rind–though very easy to peel, in this recipe the clems keep their skin on.

Put the whole fruits in a large stew pot in plenty mineral water and bring to a boil. Lower the flame and keep at a medium simmer for 15 minutes. Fish out the fruits with a slotted spoon and set aside; saving the water.

Stir in the sugar and resume the boil, at which point add the clementines back to the pot; and boil for 30 more minutes. The sugary water will thicken and become a syrup.

Spoon out the fruits and divide them among the sterilized jars, pouring in just enough syrup to cover them (depending on jar size, you should get 5 or 6 fruits in each).

Firmly close the lid of each jar, turn the jars cap side down and wrap them close together in a warm fleece or woolly blanket in a dimly lit room, away from drafts, overnight. This rather mysterious-sounding procedure is the technique that guarantees pasteurization. Thanks to the heat, jars are hermetically sealed, and through natural vacuum, air is expelled. The result will be that the capsule in the lids of the jars will no longer "pop" when pressed down. If the capsule still pops, repeat pasteurization process with a new lid. Once the jars are vacuum sealed, they can be stored in your pantry for 10-13 months.

Tip: Stir some of the citrusy syrup in one or two tablespoons of mustard (according to taste) as a rascally piquant condiment for bollito misto, cotechino or grilled meats.


*Safe and hygienic preserving is obtained by using new jars and special lids with soft rubber gaskets that ensure a "venting" effect during pasteurization, and that provide an effective, long-lasting vacuum seal. Furthermore, the paint must be suitable for contact with the foods on the inside. The jars and lids I use are The Quattro Stagioni Line by the Italian manufacturer Bormioli Rocco. 
To learn more about the technical features on their website, click HERE

Sep 2, 2009

Be my guest - Green tomato chutney recipe

Today I'm handing my virtual toque hat to Delwyn. She will be doing the cooking here today, and I will learn something new. She is a very talented blogger and we share the same culinary passions based on fresh, healthy ingredients. I eagerly follow all her fabulous nature walks and cooking posts on her beautiful blog A Hazy Moon.

Some time ago Delwyn and I exchanged comments and views regarding my Pommarola post, and she mentioned a family legacy recipe. She was kind enough to accept my invitation to be a guest blogger here today, to illustrate that very recipe for us to share. This entry will also serve as a springboard for a new column which I have called "Be my guest" for which I will invite friends and fellow bloggers to come tell us a recipe of theirs, a pièce de resistance, a cookery family tradition, their signature dish.
I for one, am not a trained professional nor a chef. My qualifications are purely alimentary. In my community of bloggers, we are all certified Eaters with a passion for food, however. In my "You're the cook today" weekly column, each of you will have a chance to contribute your favorite recipes and widen your circle of friends as the official Aglio, Olio & Peperoncino chef of the day.

So come in, Delwyn. Don't be shy. Here's the stove and a clean apron. The pantry is well-stocked and the refrigerator humming over there is filled with anything you might need. Feel free to peruse the cabinets. There's plenty of herbs on the windowsill, and some wine resting sideways in the cellar. I can't wait to see you in action, so I'll just step aside now and watch you make your delicious...

Green Tomato Chutney from New Zealand

A while back joyful Lola was telling us of making sugo while holidaying with her family.
I mentioned that her story brought back the smells and the images of hot nights late in summer when my parents would chop tomatoes and onions at tables out on the back lawn and cook up enough tomato sauce and green tomato chutney to last through the year

Lola inquired about the Green Tomato Chutney and as I was heading off to New Zealand for a few days, I told her that I would dig out my mother's recipe.

The recipe book that holds my mother's favourite recipes has been well used over the years and I was surprised to see that it begins in my young school girl handwriting.


So a week ago I ordered sufficient green tomatoes from the Red Tomato man at the Farmers' markets and last night I began by washing and dicing the green tomatoes and the equivalent amount of onions, sprinkling them with salt and leaving them to sit overnight.


After which I drained them and went to find my spices, the vinegar and sugar.

As my supermarket did not have Pickling spices per se I made a quick call across the Tasman and was given my Mother's sage advice. Do not over do it... So I mixed some peppercorns, mustard seed, ginger, allspice and coriander seeds. Just enough to allow flavour room for the tastes of the curry powder, turmeric and mustard powder that will be added later with cornflour.


Next I boiled the mix of green tomatoes, onions, malt vinegar, sugar and pickling spices for an hour, during which time I sterilized the jars in which I chose to store the chutney.


After the hour of bubbling I thickened the chutney with the power packed brew
of curry, turmeric, cornflour and mustard, spooned it into the waiting jars...


...and made a cracker with Tasty New Zealand Mainland cheese as a sample...


or two.

Green Tomato Chutney is a great condiment for cold meats and adds a tasty pickled lift to cheese crackers.

Quantity recap:
4 lb tomatoes
4 lb onions
salt to sprinkle over
750 ml (1 3/4 pints) malt vinegar
1 oz pickling spice (tied in muslin cloth)
2 lb sugar
Boil one hour
Thicken with the following spices mixed in a little cold vinegar
1 Tb mustard powder
1 Tb curry powder
1 Tb turmeric
1 1/2 to 2 Tb cornflour

Store in sterilized jars. Refrigerate once opened


Thank you Delwyn, that was a terrific recipe. Stay tuned for more Be My Guest appearances!

Aug 13, 2009

Pommarola homemade tomato sauce recipe

Pommarola – fresh tomato and vegetable preserves – is an Italian summertime activity more than a genuine seasonal recipe. After the tomato harvest, families get busy peeling and canning tomatoes into preserves-form for the winter. This recipe expands well, and most households make gallons of it when the flood of tomatoes reaches its peak in August.

pommarola homemade tomato sauce

Mason jars filled with the final product are a delicious pantry staple. With an incredibly long shelf life.


Fresh, ripe ingredients are key, and fortunately organic heirloom, Roma, or plum tomatoes can be found in virtually every farmer's market. It is best to choose red and firm fruits for this preparation, in any variety that don't release as much water as vine-ripened or slicing tomatoes, which could extend cooking time.

Early this morning we took in 4 overflowing crates of tomatoes from the orto, the vegetable garden, which yielded 5 kg (11 lbs) of finished product. Yesterday we made double that.
Below I have listed quantities and ingredients that yield about 5 jars of pommarola:

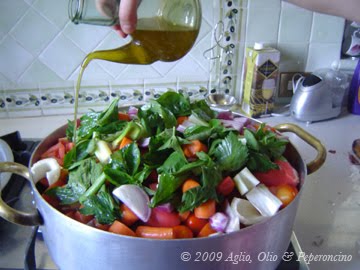
4 lbs Roma (plum) tomatoes, cored and cut into pieces
2 carrots, peeled and coarsely chopped
1 rib of celery - leaves and all - cut into pieces
1 large onion, peeled and coarsely chopped
2 bunches of fresh basil
3 tbsp Kosher sor sea alt
150 ml (3/4 cup) extra virgin olive oil
4-6 clean 10-oz capacity mason jars and capsule screw caps*

Choose a wide, heavy-bottomed pot, with a tight fitting lid, and arm yourself with a sturdy wooden spoon: your best friend for the hours to come.

Wash all the vegetables and without drying them, place them - with the salt, basil and olive oil - in the pot (remember, it has to be big enough to hold everything). Place the pot on the fire and let the ingredients cook over a lively flame, covered. Once the tomatoes begin to fall apart and exude liquid, uncover and simmer, stirring occasionally, with patience.

pommarola homemade tomato sauce
We are preparing massive amounts of Pommarola these days, which make our cooking times average around 3-4 hours, but for the quantities listed above, you should be looking at no more than 1 1/2 hours.

When all the vegetables are soft, and the derived rich and soupy tomato sauce has taken on a deep color, sexy texture and delightful aroma, it will be time to take the pot off the stove.

The next step is the hardest work, so try to recruit helpers.

Crank the sauce through a food mill and occasionally discard the pulpy stuff. This is key, because otherwise during storage, the skins and seeds of the tomato – and all other vegetable discards – turn your pommarola bitter and oddly textured.

If the resulting sauce should appear too watery, cook it uncovered for an additional 20 minutes, to thicken. Test it: if a silky spoonful on a flat plate no longer gives off a large watery halo around the dollop, it's done.

Transfer the sauce at once into clean mason jars, scooping it with a ladle. Fill each leaving a 1/4" gap, and screw the lid on. Now place all the jars huddled together, and cover them with a warm wool or fleece blanket in a dimly lit room, away from drafts, overnight.

This rather mysterious-sounding procedure is the technique that guarantees pasteurization. Thanks to the heat, jars are hermetically sealed, and through natural vacuum, air is expelled. The result will be that the capsule in the lids of the jars will no longer "pop" when pressed down. If the capsule still pops, repeat pasteurization process with a new lid. Once the jars are vacuum sealed, they can be stored in your pantry for 10 to 13 months!

As active participant and valid helper, I get to take home part of the stash. This incredible bounty will last me a year, and I will use my pommarola with profuse abandon: to dress pasta, as a base for vegetable and meat stews, to make pizza, as a dip, or instead of ketchup on my burgers.

Also, since this sugo is already cooked, all I have to do on the day is pour some out in a serving bowl (any left over in the jar needs to be refrigerated), add my cooked and drained pasta al dente, a curl of butter and a generous hand of grated Parmigiano. Voilà, "pasta al sugo" - ready and steaming on the plate.

And every time I will open one of the little red jars in the middle of winter, I will close my eyes and smell the delightful aroma of these precious summer days.


*Safe and hygienic preserving is obtained by using new jars and special lids with soft rubber gaskets that ensure a "venting" effect during pasteurization, and that provide an effective, long-lasting vacuum seal. Furthermore, the paint must be suitable for contact with the foods on the inside. The jars and lids we use are The Quattro Stagioni line by the Italian manufacturer Bormioli. To learn more about the technical features visit the Bormioli website.

May 31, 2009

Friggione recipe

Scarpetta, literally means "little shoe," God knows why. Scarpetta is the word for the act upon which a small piece of hand held bread mops up any delicious food residue in a plate and is devoured. 

Essential. Frowned upon in etiquette manuals. Not the thing to perform at a formal seated dinner. I don't usually care for that sort of table manners, so I do it all the time, regardless of dress code. That is if whatever is left in my plate is worth it and the bread is soft enough.

I'm a huge fan of scarpetta, so my dishes are usually a bit overdressed, in order to enjoy a conclusive good sweep. Be they pasta dishes, fish or meat. I usually clean the plate with the bread so carefully that I have been often called names. Or fed more food thinking my plate had been empty to begin with.

Preeminent scarpetta applies to those dishes that require large amounts of sauce, like for example a slippery plate of Bucatini all'Amatriciana, or homemade tagliatelle al ragù or a very juicy roast. Once you've eaten the food, whatever's left in the plate, is scarpetta material. Otherwise, scarpetta can be performed with those dishes whose sole purpose is being sopped by a spongy chunk of warm bread. Friggione falls into this second category.


Friggione is a tomato and onion sauce typical of Bologna, the epicurean city also known as la dotta (the learned) and la grassa (the fat).

This sauce is exclusively intended for dipping bread as a fully authorised scarpetta antipasto. Rich and absurdly tasty, friggione takes forever to make, and employs politically incorrect amounts of onion.

The time-consuming recipe to exquisite friggione, dating back to 1886, is made with the following ingredients:

1 kg (2.2 lbs) white onions, thinly sliced
500 g (1.1 lb) ripe tomatoes, peeled, seeded and finely chopped (or a 28-oz can of preserved tomatoes)
1 tbsp tomato paste
1 tbsp sugar
1 tbsp kosher salt
4 tbsp extra virgin olive oil

Thinly slice the onion (for best results, use a mandoline) and leave it to macerate with the salt and sugar in a large bowl.

Pour the onion – and the resulting maceration juice – in preferably a terracotta stewpot (not iron, non-stick, copper or enamelled) with the oil, and over a gentle heat, cook it slowly stirring with a wooden spoon.

Keep cooking at a very low simmer until the onions wilt, making sure they don’t stick to the bottom of the pot. Add a little broth or hot water should the onions dry. This could take a while.

At this point, add the chopped tomatoes over very low heat, stirring for 2 hours. Yes, maybe even 2 and a half.

No, I'm not kidding.

Adjust seasoning and keep moist with water (or a little vegetable broth) if necessary.

When your patience has completely run out and the onion and tomatoes will have become a lovely geranium-colored purée, the friggione will be ready. And it will have been worth the wait, believe me.

Buon appetito!

Share!